As the title would suggest, this is another post to tell us more on Formwork.
Just before I go into that, in response to the preceeding post on Formwork, I recieved some funny comments via Facebook. Ademola, an Arsenal FC fan said his team needs formwork and he suggested I recommend the highest diameter of reinforcement bars for the team. I couldn’t stop laughing but the truth is he want his team to come out clean. On the international scene too, drama happened, while some fans called for Arsene’s head some maintained the phrase “In Arsene Wenger we trust”. Either way am not to take side but I would like say that these responses reaffirms the need for good forms.
In building construction, certain components are derived by placing concrete in formworks. More so, a building may have all its components precast including the walls.
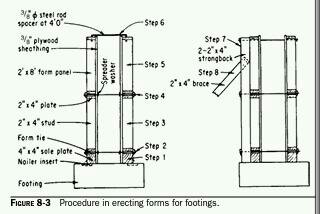
Procedure for Erection of Forms for Footings Figure 8-3 will be used to illustrate and describe the step-by-step procedure for erecting wall forms using these panels. At the time the wall footing was poured, short pieces of lumber were set in the concrete flush with the top surface of the footing at about 4-ft intervals to serve as nailer inserts. The procedure in erecting the forms is as follows:
1. Place two rows of plywood-faced 4 × 4 S4S lumber, with the inner faces separated by the thickness of the wall, along the footing as sole plates. The top edge of the plywood facing extends¹⁄8 in. above the top of each plate. Toe-nail the plates to the nailer inserts in the footing.
2. Place through-wall button-end spreader ties at the desired spacing across the sole plates. Either hit each tie with a hammer to embed it in the projecting edge of the plywood or precut notches in the edge of the plywood to receive the ties.
3. Set the lower tier of form panels on the sole plates extending along the footing, with the ends of the panels butting against each other. Fasten the end studs of adjacent panels together, using bolts, short form ties, or double-headed nails. Then nail the lower plate of each form panel to the 4- by 4-in. sill plate, and wedge-clamp the form ties.
4. Space form ties along the top surface of the tier panels.
5. Set another tier of form panels on top of the lower tier. Fasten the ends of the panels together, as described previously, and then nail the bottom plate of the second tier to the top plate of the first tier. Then wedge-clamp the second row of form ties.
6. Install form spacers across the top tier of forms, using 1 × 4 wood boards, metal straps, U-shaped steel rods set through prebored holes in the top plate, or some other suitable method. The U-shaped rods can be inserted and removed quickly and should have a very long life.
7. Install vertical double 2 × 4 wood strongbacks along the inside wall, at 8-ft spacings at the end junctures of panels, using through-wall form ties to hold them in place.
8. As the forms are aligned, attach a brace near the top of each strongback and to a stake set in the ground. Erecting and stripping the forms can proceed at a very rapid rate after the form crew becomes familiar with this procedure.
Excerpt from:
Formwork for Concrete Structures by
Robert L. Peurifoy Late Consulting Engineer Austin, Texas Garold D. Oberlender Professor Emeritus Oklahoma State University
“docendo discitur”: It is learned by teaching.
